|
|
|
|

Change directly to where you have the tar file. (use a temp directory. I used /tmp/download/)
# su
Extract the files using the following command.
# cd /tmp/download/
Change to the NEW directory which was created during the extract.
# gunzip -dc mysql-3.22.32.tar.gz | tar xvf -
Now you can run "configure" for the MySQL server. You can specify many options with the configure command. Type "configure --help" to see all options. We're using the "--prefix" option to specify the direct path to the installation location. Configure will check for your compiler and a couple of other things. If you have any errors you can check the config.cache file to see the errors.
# cd mysql-3.22.32
After you are done with the configure. You can make the actual binaries by executing the following line (this will take a while).
# configure --prefix=/usr/local/mysql
Now you are ready to install all the binaries. Run the following lines to install the binaries to the directory you specified with the configure "--prefix" option.
# make
Now it is time to create the mysql tables used to define the permissions. Make sure you replace "new-password" with something of your choice, otherwise, new-password will be your root password.
# make install
You can ensure that MySQL is working by running some simple tests to verify that the server is working. The output should be similar to what is shown below:
# scripts/mysql_install_db
# cd /usr/local/mysql/bin
# ./safe_mysqld &
# ./mysqladmin -u root password 'new-password'
Once you install MySQL, it will automatically create two databases. One is the mysql table which controls users, hosts, and database permissions in the actual server. The other is a test database. We could use the test database, however, we want to give you a quick and simple overview of some of the command line options available with MySQL. Also, this will ensure that root has been set up with full access to the database server (i.e. root has permission to create databases, tables, etc.) We will create a "test2" database that we will use later for our testing after logging into the MySQL server.
# BINDIR/mysqlshow -p
Enter password:
+ -------------------- + | Databases | + -------------------- + | mysql | + -------------------- +
Now select the test2 database, and create a new table called tst_tbl, with the two following fields. Field 1, which is an id field which lets you know the id of the record. Essentially, this is just a row number for simplicity. The second field is a name field in which you will store name information about books. The formats for these fields are.. field 1 (id) is an integer (int) of length 3, and field 2 (name) is a character (char) field of length 50. We assign id to be the key for searching and indexing the data.
#mysql -u root -p
Enter password:
mysql> show databases;2 rows in set (0.00 sec)
+ -------------------- + | Database | + -------------------- + | mysql | | test | + -------------------- +
mysql> create database test2;
Query OK, 1 row affected (0.00 sec)
Now we can verify that indeed everything is correct with the following commands.
mysql> use test2;
Database changed
mysql> CREATE TABLE books (
-> id int(3) not null auto_increment,
-> name char(50) not null,
-> unique(id),
-> primary key(id)
-> );
Query OK, 0 rows affected (0.00 sec)
Notice that the describe command basically "describes" the table layout. Pretty cool hey?!
mysql> show tables;1 row in set (0.00 sec)
+ ------------------------------ + | Tables in text2 | + ------------------------------ + | books | + ------------------------------ + mysql> describe books;
2 rows in set (0.00 sec)
+ ------- + ------------- + ------ + ------ + ---------- + ------------------------ + | Field | Type | Null | Key | Default | Extra | + ------- + ------------- + ------ + ------ + ---------- + ------------------------ + | id | int(3) | | PRI | 0 | auto_increment | | name | char(50) | | | | | + ------- + ------------- + ------ + ------ + ---------- + ------------------------ +
Now we can check the new records, and issue a select all command.
mysql> INSERT INTO books (name) values('PHP 4 Newbies');
Query OK, 1 row affected (0.00 sec)
mysql> INSERT INTO books (name) values('Red Hat Linux 6 Server');
Query OK, 1 row affected (0.00 sec)
Great, the MySQL server is fully functional. We could continue to add records, but it makes no sense at this time. Notice how you did not have to specify the id number when you inserted the record in the database. This is because you created the id field with the auto_increment option enabled.
mysql> SELECT * from books;2 rows in set (0.00 sec)
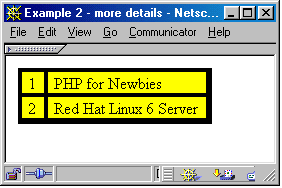
+ ---- + -------------------------------------- + | id | name | + ---- + -------------------------------------- + | 1 | PHP 4 Newbies | | 2 | Red Hat Linux 6 Server | + ---- + -------------------------------------- +
Ok, exit MySQL and continue with the setup...you can play with MySQL later after you have completed all the installations and everything is working properly.
mysql> delete from books where id=1;
Query OK, 1 row affected (0.00 sec)
mysql> select * from books;1 row in set (0.00 sec)
+ ---- + ----------------------------------- + | id | name | + ---- + ----------------------------------- + | 2 | Red Hat Linux 6 Server | + +---- + +----------------------------------- +
Ok, now you can start with PHP. Extract the source files and change to the new directory.
# cd /tmp/download
# gunzip -c apache_1.3.12.tar.gz | tar xf -
# cd apache_1.3.12
# ./configure --prefix=/usr/local/apache
# cd ..
Configure will always be your friend if you are compiling code :-) So, again there are many options with the configure command. Use "configure --help" to determine what you want to add. We just want MySQL and of course Apache.
# gunzip -c php-4.0.0.tar.gz | tar xf -
# cd php-4.0.0
Make and install the binaries.
# ./configure --with-mysql=/usr/local/mysql \
--with-xml \
--with-apache=../apache_1.3.12 \
--enable-track-vars
Copy the ini file to the lib directory.
# make
# make install
You can edit the PHP file to set PHP options. You could for example increase the "max_execution_time" in PHP by inserting the following line in your php.ini file.
# cp php.ini-dist /usr/local/lib/php.ini
max_execution_time = 60;
| + | --------------------------------------------------------------------------------------------------------- | + |
| | | IGNORE THE RSAREF SECTION IF YOU ARE NOT IN THE U.S. | | |
| + | --------------------------------------------------------------------------------------------------------- | + |
Now configure and build the OpenSSL library. When you're a U.S. citizen you have to build OpenSSL in conjunction with the RSAref library.
# mkdir rsaref-2.0
# cd rsaref-2.0
# gzip -dc ../rsaref20.tar.Z | tar xvf -
# cd rsaref-2.0
# cp -rp install/unix local
# cd local
# make
# mv rsaref.a librsaref.a
# cd ../..,
| + | ------------------------------------------------------------------------------------------------------------- | + |
| | | END OF THE RSAREF SECTION, PLEASE CONTINUE READING | | |
| + | -------------------------------------------------------------------------------------------------------------- | + |
Now make it, test it, and install it.
# gunzip -dc openssl-0.9.5a.tar.gz | tar xvf -
# cd openssl-0.9.x
#./config --prefix=/usr/local/ssl \
-L`pwd`/../rsaref-2.0/local/rsaref -fPIC
We will configure the Mod_SSL module and then specify it to be a loadable module with the Apache configuration.
# make
# make test
# make install
# cd ..
Now we can add more Apache modules to the Apache source tree. The optional "--enable-shared=ssl" option enables the building of mod_ssl as a DSO `libssl.so." Read the INSTALL and htdocs/manual/dso.html documents in the Apache source tree for more information about DSO support in Apache. We strongly advise ISPs and package maintainers to use the DSO facility for maximum flexibility with Mod_SSL, but notice that DSO is not supported by Apache on all platforms.
# gunzip -dc mod_ssl-2.6.4-1.3.12.tar.gz |tar xvf -
# cd
# ./configure --with-apache=../apache_1.3.12
# cd ..
Make Apache, then make certificates, and install...
# cd apache_1.3.12
# SSL_BASE=../openssl-0.9.x \
RSA_BASE=../rsaref-2.0/local \
./configure \
--enable-module=ssl \
--activate-module=src/modules/php4/libphp4.a \
--enable-module=php4 \
--prefix=/usr/local/apache \
--enable-shared=ssl
[...you can add more options here...]
If you have done everything right you will a message similar to the following:
# make
Now you can create a custom certificate. This option will prompt your for location, company, and a couple other things. Certificates are explained in a separate tutorial.
+ ---------------------------------------------------------------------------------------------------------------- + | Before you install the package you now should prepare the SSL | | certificate system by running the 'make certificate' command. | | For different situations the following variants are provided: | | | | % make certificate TYPE=dummy (dummy self-signed Snake Oil cert) | | % make certificate TYPE=test (test cert signed by Snake Oil CA) | | % make certificate TYPE=custom (custom cert signed by own CA) | | % make certificate TYPE=existing (existing cert) | | CRT=/path/to/your.crt [KEY=/path/to/your.key] | | Use TYPE=dummy when you're a vendor package maintainer, | | the TYPE=test when you're an admin but want to do tests only, | | the TYPE=custom when you're an admin willing to run a real server | | and TYPE=existing when you're an admin who upgrades a server. | | (The default is TYPE=test) | | | | Additionally add ALGO=RSA (default) or ALGO=DSA to select | | the signature algorithm used for the generated certificate. | | | | Use 'make certificate VIEW=1' to display the generated data. | | | | Thanks for using Apache & mod_ssl. Ralf S. Engelschall | | rse@engelschall.com | | www.engelschall.com | | | + ---------------------------------------------------------------------------------------------------------------- +
Now install Apache..
# make certificate TYPE=custom
If everything went well, the message that you should see is something similar to this:
# make install
Now it's time to see if Apache and PHP are working, however, we need to edit the httpd.conf of srm.conf to ensure we added the PHP type to the configuration.
+ -------------------------------------------------------------------------------------------- + | You now have successfully built and installed the | | Apache 1.3 HTTP server. To verify that Apache actually | | works correctly you now should first check the | | (initially created or preserved) configuration files | | | | /usr/local/apache/conf/httpd.conf | | and then you should be able to immediately fire up | | Apache the first time by running: | | | | /usr/local/apache/bin/apachectl start | | Or when you want to run it with SSL enabled use: | | | | /usr/local/apache/bin/apachectl startssl | | Thanks for using Apache. The Apache Group | | http://www.apache.org/ | + -------------------------------------------------------------------------------------------- +
Now we are ready to start the Apache server to see if its working. First we will start the server without the SSL support to see if it comes up. We will check for PHP support and then we will stop the server and start it with the SSL support enabled and see if we got everything working. The configtest will check that all the configuration is setup properly.
>
> # And for PHP 4.x, use:
> #
---> AddType application/x-httpd-php .php
---> AddType application/x-httpd-php-source .phps
>
>
# cd /usr/local/apache/bin
# ./apachectl configtest
Syntax OK
# ./apachectl start
./apachectl start: httpd started
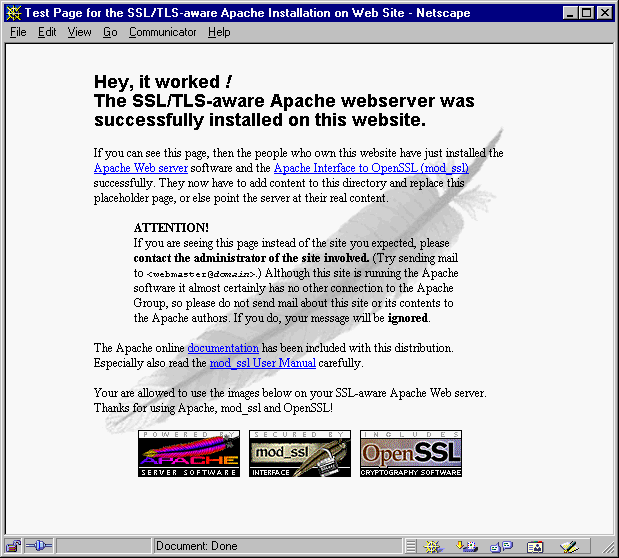
Test to see if it works, by connecting to the server with a Netscape and selecting the https protocol, (i.e. https://yourserver.yourdomain.com or http://yoursever.yourdomain.com:443 again). Also, try your server's ip (i.e. https://xxx.xxx.xxx.xxx: and http://xxx.xxx.xxx.xxx:443).
# /usr/local/apache/bin/apachectl stop
# /usr/local/apache/bin/apachectl startssl

A more complex example will show you some of the cool features of PHP.
<?
$dbuser = 'root';
$dbhost = 'localhost';
$dbpass = 'password';
$dbname = 'test2';
$dbtble = 'books';
$mysql_link = mysql_connect($dbhost,$dbuser,$dbpass);
$column = mysql_list_fields($dbname,$dbtble,$mysql_link);
for($i=0; $i< mysql_num_fields($column); $i++ )
{
print mysql_field_name($column,$i )."<br>";
}
?>
<html>
<head>
<title>Example 2 -- more details</title>
</head>
<body bgcolor="white">
<?
$dbuser = 'root';
$dbhost = 'localhost';
$dbpass = 'password';
$dbname = 'test2';
$dbtable = 'books';
//------ DATABASE CONNECTION --------//
$mysql_link = mysql_connect($dbhost,$dbuser,$dbpass);
$column = mysql_list_fields($dbname,$dbtable,$mysql_link);
$sql = "SELECT * FROM $dbtable";
$result = mysql_db_query($dbname,$sql);
?>
<table bgcolor="black">
<tr><td>
<table><!---- Inside Table ---->
<?
while($value = mysql_fetch_array($result))
{
print "<tr BGCOLOR=YELLOW>";
//This loop goes through the colums and prints
//each value
for($i=0; $i< mysql_num_fields($column); $i++ )
{
print "<td> $value[$i] </td>";
}
print "</tr>";
}
mysql_free_result($result);
mysql_close();
?>
</table><!---- Inside Table ----->
</td></tr>
</table>
</body>
</html>